“AngularJS is a JavaScript framework which simplifies binding JavaScript objects with HTML UI elements.”
Let us try to understand the above definition with simple sample code.
Below is a simple “Customer” function with “CustomerName” property.
We have also created an object called as “Cust” which is of “Customer”
class type.
Hide Copy Code
function Customer()
{
this.CustomerName = "AngularInterview";
}
var Cust = new Customer();
Now let us say the above customer object we want to bind to a HTML
text box called as “TxtCustomerName”. In other words when we change
something in the HTML text box the customer object should get updated
and when something is changed internally in the customer object the UI
should get updated.
Hide Copy Code
<input type=text id="TxtCustomerName" onchange="UitoObject()"/>
So in order to achieve this communication between UI to object
developers end up writing functions as shown below. “UitoObject”
function takes data from UI and sets it to the object while the other
function “ObjecttoUI” takes data from the object and sets it to UI.
Hide Copy Code
function UitoObject()
{
Cust.CustomerName = $("#TxtCustomerName").val();
}
function ObjecttoUi()
{
$("#TxtCustomerName").val(Cust.CustomerName);
}
So if we analyze the above code visually it looks something as shown
below. Your both functions are nothing but binding code logic which
transfers data from UI to object and vice versa.
Now the same above code can be written in Angular as shown below. The
javascript class is attached to a HTML parent div tag using
“ng-controller” directive and the properties are binded directly to the
text box using “ng-model” declarative.
So now whatever you type in the textbox updates the “Customer” object
and when the “Customer” object gets updated it also updates the UI.
Hide Copy Code
<div ng-controller="Customer">
<input type=text id="txtCustomerName"  ng-model="CustomerName"/>
</div>
In short if you now analyze the above code visually you end up with
something as shown in the below figure.You have the VIEW which is in
HTML, your MODEL objects which are javascript functions and the binding
code in Angular.
Now that binding code have different vocabularies.
- Some developers called it “ViewModel” because it connects the “Model” and the “View” .
- Some call it “Presenter” because this logic is nothing but presentation logic.
- Some term it has “Controller” because it controls how the view and the model will communicate.
To avoid this vocabulary confusion Angular team has termed this code
as “Whatever”. It’s that “Whatever” code which binds the UI and the
Model. That’s why you will hear lot of developers saying Angular
implements “MVW” architecture.
Directives are attributes decorated on the HTML elements. All
directives start with the word “ng”. As the name says directive it
directs Angular what to do.
For example below is a simple “ng-model” directive which tells
angular that the HTML textbox “txtCustomerName” has to be binded with
the “CustomerName” property.
Hide Copy Code
<input type=text id="txtCustomerName" ng-model="CustomerName"/>
Some of the most commonly used directives are ng-app,ng-controller and ng-repeat.
“Controllers” are simple javascript function which provides data and
logic to HTML UI. As the name says controller they control how data
flows from the server to HTML UI.

For example below is simple “Customer” controller which provides data
via “CustomerName” and “CustomerCode” property and Add/ Update logic to
save the data to database.
| Note: - Do not worry too much about the $scope , we will discuss the same in the next question. |
Hide Copy Code
function Customer($scope)
{
        $scope.CustomerName = "Shiv";
        $scope.CustomerCode = "1001";
        $scope.Add = function () {
        }
        $scope.Update = function () {
        }
}
“ng-controller” is a directive.Controllers are attached to the HTML
UI by using the “ng-controller” directive tag and the properties of the
controller are attached by using “ng-model” directive. For example below
is a simple HTML UI which is attached to the “Customer” controller via
the “ng-controller” directive and the properties are binded using
“ng-model” directive.
Hide Copy Code
<div ng-controller="Customer">
<input type=text id="CustomerName"  ng-model="CustomerName"/><br />
<input type=text id="CustomerCode"  ng-model="CustomerCode"/>
</div>
Angular expressionsare unit of code which resolves to value. This code is written inside curly braces “{“.
Below are some examples of angular expressions:-
The below expression adds two constant values.
Hide Copy Code
{{1+1}}
The below expression multiplies quantity and cost to get the total value.
Hide Copy Code
The value total cost is {{ quantity * cost }}
The below expression displays a controller scoped variable.
Hide Copy Code
<div ng-controller="CustomerVM">
The value of Customer code is {{CustomerCode}}
</div>
The value of Customer code is {{CustomerCode}}
We can use “ng-init” directive to achieve the same. You can see in
the below example we have used “ng-init” directive to initialize the
“pi” value.
Hide Copy Code
<body ng-app="myApp" ng-init="pi=3.14">
The value of pi is {{pi}}
</body>
“$scope” is an object instance of a controller. “$scope” object
instance get’s created when “ng-controller” directive is encountered.
For example in the below code snippet we have two controllers
“Function1” and “Function2”. In both the controllers we have a
“ControllerName” variable.
Hide Copy Code
function Function1($scope)
{
$scope.ControllerName = "Function1";
}
function Function2($scope)
{
$scope.ControllerName = "Function2";
}
Now to attach the above controllers to HTML UI we need to use
“ng-controller” directive. For instance you can see in the below code
snippet how “ng-controller” directive attaches “function1” with “div1”
tag and “function2” with “div2” tag.
Hide Copy Code
<div id="div1" ng-controller="Function1">
Instance of {{ControllerName}} created
</div>
<div id="div2" ng-controller="Function2">
Instance of {{ControllerName}} created
</div>
So this is what happens internally. Once the HTML DOM is created
Angular parser starts running on the DOM and following are the sequence
of events:-
- The parser first finds “ng-controller” directive which is pointing
to “Function1”. He creates a new instance of “$scope” object and
connects to the “div1” UI.
- The parser then starts moving ahead and encounters one more
“ng-controller” directive which is pointing to “Function2”. He creates a
new instance of “$scope” object and connects to the “div2” UI.
Now once the instances are created, below is a graphical
representation of the same. So the “DIV1” HTML UI is binded with
“function1” $scope instance and the “DIV2” HTML UI is binded with
“function2” $scope instance. In other words now anything changes in the
$scope object the UI will be updated and any change in the UI will
update the respective $scope object.
“$rootScope” is a parent object of all “$scope” angular objects created in a web page.
Let us understand how Angular does the same internally. Below is a
simple Angular code which has multiple “DIV” tags and every tag is
attached to a controller. So let us understand step by step how angular
will parse this and how the “$rootScope” and “$scope” hierarchy is
created.
The Browser first loads the above HTML page and creates a DOM
(Document object model) and Angular runs over the DOM.Below are the
steps how Angular creates the rootscope and scope objects.
- Step 1:- Angular parser first encounters the “ng-app” directive and creates a “$rootScope” object in memory.
- Step 2:- Angular parser moves ahead and finds the expression {{SomeValue}}. It creates a variable
- Step 3:- Parser then finds the first “DIV” tag with “ng-controller”
directive which is pointing to “Function1” controller. Looking at the
“ng-controller” directive it creates a “$scope” object instance for
“Function1” controller. This object it then attaches to “$rootScope”
object.
- Step 4:- Step 3 is then repeated by the parser every time it finds a
“ng-controller” directive tag. Step 5 and Step 6 is the repetition of
Step 3.
If you want to test the above fundamentals you can run the below
sample Angular code. In the below sample code we have created
controllers “Function1” and “Function2”. We have two counter variables
one at the root scope level and other at the local controller level.
Hide Copy Code
<script language="javascript">
function Function1($scope, $rootScope)
{
$rootScope.Counter = (($rootScope.Counter || 0) + 1);
$scope.Counter = $rootScope.Counter;
$scope.ControllerName = "Function1";
}
function Function2($scope, $rootScope)
{
$rootScope.Counter = (($rootScope.Counter || 0) + 1);
$scope.ControllerName = "Function2";
}
var app = angular.module("myApp", []);
app.controller("Function1", Function1);
app.controller("Function2", Function2);
</script>
Below is the HTML code for the same. You can we have attached
“Function1” and “Function2” two times with “ng-controller” which means
four instances will be created.
Hide Copy Code
<body ng-app="myApp" id=1>
   Global value is {{Counter}}<br />
<div ng-controller="Function1">
       Child Instance of {{ControllerName}} created :- {{Counter}}
</div><br />
<div ng-controller="Function2">
       Child Instance of {{ControllerName}} created :- {{Counter}}
</div><br />
<div ng-controller="Function1">
        Child Instance of {{ControllerName}} created :- {{Counter}}
</div><br />
<div ng-controller="Function2">
        Child Instance of {{ControllerName}} created :- {{Counter}}
</div><br />
</body>
Above is the output of the code you can see the global variable of
root scope has be incremented four times because four instances of
$scope have been created inside “$rootScope” object.
Angular is a MVW framework. It helps us to bind the model and the
view. In other words when any change happens in the model the view gets
updated. This updation of the model and the view is done by a loop
called as digest cycle.
Digest cycle follows four important steps:-
- Step 1:- Some kind of event is triggered by the end user like
typing (onchange), button click etc and due to this activity model value
changes.
- Step 2:- Angular first checks if the new value and old values are
same. If they are same he does not do anything. If they are not it then
it invokes the digest cycle.
- Step 3:- Digest cycle then runs through the scope objects to check
which objects are getting affected because of this change. Every object
in the scope have watchers. Watchers as the name says it listens whether
the model has changed or not. Digest cycle informs the watchers about
the model change and then watchers synchronize the view with the model
data.
- Step 4 :- In step 3 watchers update the view and due that update
its very much possible that the model changes again. Now due to this
model change we have to reevaulate the view again. So the digest loop
runs once again to ensure that all things are synched up. This second
loop which runs is termed as dirty check loop.
Below is the figure where in we have highlighted all the four steps.

So summarizing definitions for the above three concepts:-
- Digest cycle: - It is a simple loop which updates the model and view.
- Watchers :- They are listeners which are attached to expression and angular directives and fire when the model data changes.
- Dirty check :- This is a extra digest loop which runs to check any cascading left over updates due to the first digest cycle.
If there lot of unnecessary watchers then digest cycle has to work
harder. As per AngularJS team having more than 2000 watchers on Angular
screen is a bad practice.
Consider the below simple example where we have two ng-models and
three expression. So in all we should have 5 watchers for the below
screen

There are lot of great open source tools which help you to figure out
the number of watchers , one such tool is the “batarang” tool. It’s a
simple Google chrome extension which you can install separately.
Below is a simple snapshot where in we ran the above program ,
pressed f12 , enabled batarang and below are the results. You can see
that he is showing 5 total watchers and for that digest cycle ran for
0.07 MS.

To decrease digest cycle time you need to decrease the number of
watchers. Below are some best practices you can follow to decrease
number of watchers :-
- Remove unnecessary watchers.
- Use one time Angular binding. Especially if you see ng-repeat loop apply one time binding.
- Work in batches.
- Cache DOM
- Use Web worker
Yes , you can force it to run manually by calling the “$apply()” method.
No , you do not need Jquery for Angular. It’s independent of Jquery.
Its two way binding. So whenever you make changes in one entity the other entity also gets updated.
At the heart Angular framework is a parser. A parser which parses the Angular directives and render’s HTML output.
Angular parser works in 3 steps:-
Step 1:- HTML browser parses the HTML and creates a DOM (Document Object Model).
Step 2:- Angular framework runs over this DOM looks at the Angular directives and manipulates the DOM accordingly.
Step 3:- This manipulated is then rendered as HTML in the browser.
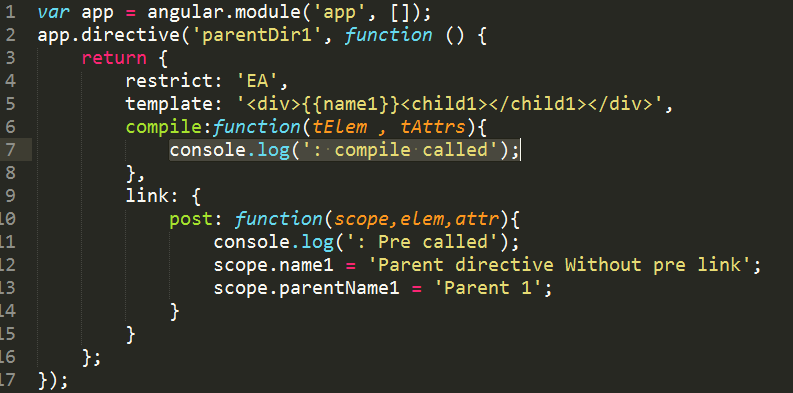
Now the above angular parsing is not so simple as it looks to be. It
occurs in two phases “Compile” and “Link”. Firs the compile phase occurs
then the link phase.
In compile phase the angular parser starts parsing the DOM and
whenever the parser encounters a directive it create a function. These
functions are termed as template or compiled functions. In this phase we
do not have access to the $scope data.
In the link phase the data i.e. ($scope) is attached to the template function and executed to get the final HTML output.
To make HTTP calls we need to use the “$http” service of Angular. In
order to use the http services you need to make provide the “$http” as a
input in your function parameters as shown in the below code.
Hide Copy Code
function CustomerController($scope,$http)
{
$scope.Add = function()
{
$http({ method: "GET", url: "http://localhost:8438/SomeMethod" }).success(function (data, status, headers, config)
{
}
}
}
“$http” service API needs atleast three things:-
- First what is the kind of call “POST” or “GET”.
- Second the resource URL on which the action should happen.
- Third we need to define the “success” function which will be executed once we get the response from the server.
Hide Copy Code
$http({ method: "GET", url: "http://localhost:8438/SomeMethod" }).success(function (data, status, headers, config)
{
}
You need to pass data using the “data” keyword in the “$http” service
API function. In the below code you can see we have created a
javascript object “myData” with “CustomerName” property. This object is
passed in the “$http” function using HTTP POST method.
Hide Copy Code
Var myData = {};
myData.CustomerName = "Test";
$http({ method: "POST",
data: myData,
url: "http://www.xyz.com"})
.success(function (data, status, headers, config)
{
}
Dependency injection is a process where we inject the dependent
objects rather than consumer creating the objects. DI is everywhere in
Angular or we can go one step ahead and say Angular cannot work without
DI.
For example in the below code “$scope” and “$http” objects are
created and injected by the angular framework. The consumer i.e.
“CustomerController” does not create these objects himself rather
Angular injects these objects.
Hide Copy Code
function CustomerController($scope,$http)
{
}
There are two big benefits of DI: - Decoupling and Testing.
Let’s first start with Decoupling. Consider your application has a
logger functionality which helps to log errors , warning etc in some
central place. This central place can be a file, event viewer, database
etc.
Hide Copy Code
function FileLogger()
{
        this.Log = function () {
            alert("File logger");
        };
}
function EventLogger()
{
        this.Log = function () {
            alert("Event viewer logger");
        };
}
Now let’s say you have a “Customer” class who wants to use the
“Logger” classes. Now which “Logger” class to use depends on
configuration.
So the code of “Customer” is something as shown below. So depending
on the configuration “Customer” class either creates “FileLogger” or it
creates “EventLogger” object.
Hide Copy Code
function Customer($scope, Logger)
{
        $scope.Logger = {};
        if (config.Loggertype = "File")
{
            $scope.Logger = new FileLogger();
        }
        else
{
            $scope.Logger = new EventLogger();
        }
}
But with DI our code becomes something as shown below. The “Customer”
class says he is not worried from where the “Logger” object comes and
which type of “Logger” objects are needed .He just wants to use the
“Logger” object.
Hide Copy Code
function Customer($scope,$http, Logger)
{
        $scope.Logger = Logger;
}
With this approach when a new “Logger” object gets added the
“Customer” class does not have to worry about the new changes because
the dependent objects are injected by some other system.
The second benefit of DI is testing. Let’s say you want to test the
“Customer” class and you do not have internet connection. So your
“$http” object method calls can throw errors. But now you can mock a
fake “$http” object and run your customer class offline without
errors.The fake object is injected using DI.
Service helps to implement dependency injection. For instance let’s
say we have the below “Customer” class who needs “Logger” object. Now
“Logger” object can be of “FileLogger” type or “EventLogger” type.
Hide Copy Code
function Customer($scope,$http, Logger)
{
        $scope.Logger = Logger;
}
So you can use the “service” method of the application and tie up the
“EventLogger” object with the “Logger” input parameter of the
“Customer” class.
Hide Copy Code
var app = angular.module("myApp", []);
app.controller("Customer", Customer);
app.service("Logger", EventLogger);
So when the controller object is created the “EventLogger” object is injected automatically in the controller class.
Angular Services create and inject global instances. For example
below is a simple “HitCounter” class which has a “Hit” function and this
function increments the variable count internally every time you call
hit the button.
Hide Copy Code
function HitCounter()
{
       var i = 0;
        this.Hit = function ()
        {
            i++;
            alert(i);
        };
}
This “HitCounter” class object is injected in “MyClass” class as shown in the below code.
Hide Copy Code
function MyClass($scope, HitCounter)
{
 $scope.HitCounter = HitCounter;
}
Below code advises the Angular framework to inject “HitCounter” class
instance in the “MyClass” class. Read the last line of the below code
specially which says to inject the inject the “HitCounter” instance.
Hide Copy Code
var app = angular.module("myApp", []);
app.controller("MyClass", MyClass);
app.service("HitCounter", HitCounter);
Now let’s say that the “Controller” “MyClass” is attached to twodiv tag’s as shown in the below figure.
So two instances of “MyClass” will be created. When the first
instance of “MyClass” is created a “HitCounter” object instance is
created and injected in to “MyClass” first instance.
When the second instance of “MyClass” is created the same
“HitCounter” object instance is injected in to second instance of
“MyClass”.
Again I repeat the same instance is injected in to the second instance, new instances are not created.
If you execute the above code you will see counter values getting
incremented even if you are coming through different controller
instances.
“Factory” in real world means a premise where products are
manufactured. Let’s take an example of a computer manufacturing firm.
Now the company produces different kinds and sizes of computers
likelaptops,desktops, tablets etc.
Now the process of manufacturing the computer products are same with
slight variation. To manufacture any computer we need processor, RAM and
hard disk. But depending on what kind of final case packing is the
final product shapes.
That’s what the use of Factory in Angular.
For example see the below code we have a “Customer”, “Phone” and “Address” class.
Hide Copy Code
function Customer()
{
        this.CustomerCode = "1001";
        this.CustomerName = "Shiv";
}
function Phone()
{
        this.PhoneNumber = "";
}
function Address()
{
        this.Address1 = "";
        this.Address2 = "";
}
So now we would create different types of “Customer” object types using the combination of “Address” and “Phones” object.
- We would like to combine “Customer” with “Address” and create a “Customer” object which has “Address” collection inside it.
- Or must be we would like to create “Customer” object with “Phone” objects inside it.
- Or must be “Customer” object with both “Phone” and “Address” objects.
In other words we would like to have different permutation and combination to create different types of “Customer” objects.
So let’s start from bottom. Let’s create two factory function’s one
which creates “Address” object and the other which creates “Phone”
objects.
Hide Copy Code
functionCreateAddress()
{
var add = new Address();
return add;
}
functionCreatePhone()
{
var phone =  new Phone();
return phone;
}
Now let’s create a main factory function which uses the above two
small factory functions and gives us all the necessary permutation and
combination.
In the below factory you can see we have three functions:-
- “CreateWithAddress” which creates “Customer” with “Address” objects inside it.
- “CreateWithPhone” which creates “Customer” object with “Phone” objects inside it.
- “CreateWithPhoneAddress” which creates “Customer” object with aggregated “Phone” and “Address” objects.
Hide Copy Code
function CreateCustomer() {

return {
CreateWithAddress: function () {
varcust = new Customer();
cust.Address = CreateAddress();
returncust;
            },
CreateWithPhone: function () {
varcust = new Customer();
cust.Phone = {};
cust.Phone = CreatePhone();
returncust;
            }
            ,
CreateWithPhoneAddress: function () {
debugger;
varcust = new Customer();
cust.Phone = CreatePhone();
cust.Address = CreateAddress();
returncust;
            }
        }
    }
Below is a simple “CustomerController” which takes “CustomerFactory”
as the input. Depending on “TypeOfCustomer” it creates with “Address” ,
“Phones” or both of them.
Hide Copy Code
functionCustomerController($scope, Customerfactory)
    {

        $scope.Customer = {};
        $scope.Init = function(TypeofCustomer)
        {

if (TypeofCustomer == "1")
            {
                $scope.Customer = Customerfactory.CreateWithAddress();
            }
if (TypeofCustomer ==  "2")
            {
                $scope.Customer = Customerfactory.CreateWithPhone();
            }
if (TypeofCustomer == "3") {
                $scope.Customer = Customerfactory.CreateWithPhoneAddress();
            }
        }
    }
You also need to tell Angular that the “CreateCustomer” method needs
to be passed in the input. For that we need to call the “Factory” method
and map the “CreateCustomer” method with the input parameter
“CustomerFactory” for dependency injection.
Hide Copy Code
var app = angular.module("myApp", []);
app.controller("CustomerController", CustomerController);
app.factory("Customerfactory", CreateCustomer);
So if we consume the “CustomerController” in UI , depending on
situation it creates different flavors of “Customer” object. You can in
the below code we have three different “DIV” tags and depending on the
“TypeofCustomer” we are displaying data.
“Factory” and “Service” are different ways of doing DI (Dependency
injection) in angular. Please read the previous question to understand
what is DI.
So when we define DI using “service” as shown in the code below. This
creates a new GLOBAL instance of the “Logger” object and injects it in
to the function.
Hide Copy Code
app.service("Logger", Logger);
When you define DI using a “factory” it does not create a instance.
It just passes the method and later the consumer internally has to make
calls to the factory for object instances.
Hide Copy Code
app.factory("Customerfactory", CreateCustomer);
Below is a simple image which shows visually how DI process for “Service” is different than “Factory”.
| | Factory | Service |
| Usage | When
we want to create different types of objects depending on scenarios.
For example depending on scenario we want to create a simple “Customer”
object , or “Customer” with “Address” object or “Customer” with “Phone”
object. See the previous question for more detailed understanding. | When we have utility or shared functions to be injected like Utility , Logger , Error handler etc. |
| Instance | No Instance created. A method pointer is passed. | Global and Shared instance is created. |
Angular leverages HTML 5 validations and new form element types to implement validation.
For instance below is a simple form which has two text boxes. We have
used HTML 5 “required” validation attribute and a form element of type
“email”.
Hide Copy Code
<form name="frm1" id="frm1" >
Name :- <input type=text name="CustomerName" id="CustomerName" required />      Email :- <input type=email  name="Email" id="Email" />
<input type=submit value="Click here"/>
</form>
Below are some example of new form elements introduced in HTML 5 and Angular works with almost all of them :-
- Color.
- Date
- Datetime-local
- Email
- Time
- Url
- Range
- Telephone
- Number
- Search
When you run the above HTML inside a browser which understands HTML 5
, you will see your validations and form types in actions as shown in
the below browser screen shot.
Angular leverages HTML 5 validation attributes and new HTML 5 form
elements. Now if we want Angular to handle validation we need first stop
HTML 5 to do validation. So for that the first step is to specify
“novalidate” attribute on the form tag.
Hide Copy Code
<form name="frm1" novalidate>
-----
</form>
So now the HTML will not fire those validations it will be routed to the Angular engine to further take actions.
In other words when end user fills data in the HTML UI , validation
events are routed to Angular framework and depending on scenario Angular
sets a field called as “$Valid”. So if the validations are fine it sets
it to “True” or else its sets it to “False”.
So you can see in the below code we have attached the angular
controller and models to the text boxes. Watch the code of the button it
has “ng-disabled” attribute which is set via the “$Valid” property in a
NEGATED fashion.
Negated fashion means when there is no error it should enable the
button and when there are errors that means it’s false it should disable
the button.
Hide Copy Code
<form name="frm1" novalidate>
Name:-<input type=text ng-model="Customer.CustomerName" name="CustomerName" required />
Email :- <input type=email ng-model="Customer.Email" name="Email" />
<input type=submit value="Click here" ng-disabled="!(frm1.$valid)"/>
</form>
Note :- “Name” is needed for the validations to work.
To check for a specific field you need to use the below DOM code.
Hide Copy Code
!frm1.CustomerName.$valid
SPA is a concept where rather loading pages from the server by doing
post backs we create a single shell page or master page and load the
webpages inside that master page.
By using Angular routes.
Implementing Angular route is a five step process: -
Step 1: - Add the “Angular-route.js” file to your view.
Hide Copy Code
<script src="~/Scripts/angular-route.js"></script>
Step 2: - Inject “ngroute” functionality while creating Angular app object.
Hide Copy Code
var app = angular.module("myApp", ['ngRoute']);
Step 3: - Configure the route provider.
In route provider we need to define which URL pattern will load which
view. For instance in the below code we are saying “Home” loads
“Yoursite/Home” view and “Search” loads “YourSite/Search” view.
Hide Copy Code
app.config(['$routeProvider',
            function ($routeProvider) {;

                $routeProvider.
                        when('/Home, {
                            templateUrl: 'Yoursite/Home',
                            controller: 'HomeController'
                        }).
                        when('/Search', {
                            templateUrl: YourSite/Search',
                            controller: 'SearchController'
                        }).
                        otherwise({
                            redirectTo: '/'
                        });
            }]);
Step 4: - Define hyperlinks.
Define hyper link with the “#” structure as shown below. So now when
user clicks on the below anchor hyperlinks, these actions are forwarded
to route provider and router provider loads the view accordingly.
Hide Copy Code
<div>
<a href="#/Home">Home</a><br />
<a href="#/Search"> Search </a><br />
</div>
Step 5: - Define sections where to load the view.
Once the action comes to the router provider it needs a place holder
to load views. That’s defined by using the “ng-view” tag on a HTML
element. You can see in the below code we have created a “DIV” tag with a
place holder. So the view will load in this section.
Hide Copy Code
<div ng-view>

</div>
So if we summarize angular routing is a three step process (Below is a visual diagram for the same): -
- Step 1: - End user clicks on a hyperlink or button and generates action.
- Step 2: - This action is routed to the route provider.
- Step 3: - Router provider scans the URL and loads the view in the place holder defined by “ng-view” attribute.

Angular UI route helps to implement SPA concept using the concept of
STATES. The main goal of SPA is navigating from one view to other view
without reloading the main page. Angular UI route visualizes every view
as a STATE. When you want to navigate from one view to other view you
can either use the STATE names or use URL.

So let’s say we want to navigate from “Home.htm” view to About.htm”
view so we can define two states “Home” and “About” and link them to the
respective HTML page as shown below.
You can also specify URL by which you can move between these states by using “url” property as shown in the below code.
Hide Copy Code
myApp.config(function ($stateProvider, $urlRouterProvider) {
    $stateProvider
        .state('Home', {
            url: '/HomePage',
            templateUrl: 'Home.htm'
        })
        .state('About', {
url: '/About',
            templateUrl: 'About.htm'
        })};
Now once the states are defined to we need to use “ui-sref” and if
you want to navigate using url provide “url” value in the “href” of the
anchor tag.
We also need to provide "<ui-view>" tag to define in which location we want to load the views.
Hide Copy Code
<a ui-sref="About" href="#About">Home</a>
<a href="#Home">About</a>
<ui-view></ui-view>
Below is the complete code if HTML , please ensure you have also
referenced of “Angular-UI” js file. You can also see “App.js” file ,
this file has code which defines the states.
Hide Copy Code
<script src="Scripts/angular.js" type="text/javascript"></script>
<script src="Scripts/angular-ui-router.js" type="text/javascript"></script>
<script src="Scripts/App.js" type="text/javascript"></script>

<body ng-app="myApp">
<a ui-sref="About" href="#About">Home</a>
<a href="#Home">About</a>
<ui-view></ui-view>
</body>
</html>
Yes, you can load simple HTML content by using “template” property as shown in the highlighted code below.
Hide Copy Code
myApp.config(function ($stateProvider, $urlRouterProvider) {
    $stateProvider
          .state('About', {
url: '/About',
template: '<b>This is About us</b>'
        })};
To create a controller we need to use “controller” property of the
state provider. To specify parameters you can put the parameter name
after the url. In the below code you can see ‘Id’ parameter after the
url and also you can see how validations are applied on these parameters
using regex.
Hide Copy Code
myApp.config(function ($stateProvider, $urlRouterProvider) {
    $stateProvider
        .state('State1', {
            url: '/SomeURL/{Id:[0-9]{4,4}}',
            template: '<b>asdsd</b>',
            controller: function ($scope, $stateParams) {
                alert($stateParams.Id);
            }
        });
First let us understand the concept of nested views. We want to
navigate as follows in SPA. From main view we want to navigate to some
view and in that view we want to load some other view.
Angular UI Router helps to define nested states. Below is the code of
“MainView” in which we have defined one more state “View” and in that
we have two child states “View.SubView1” and “View.SubView2” which
points to different views.
Hide Copy Code
myApp.config(function ($stateProvider, $urlRouterProvider) {
    $stateProvider
        .state("View", {
            templateUrl: 'View.htm'
        })
        .state('View.SubView1', {
            template: '<b>Sub view 1</b>'
        }).state('View.SubView2', {
            template: '<b>Sub view 2</b>'
        });
});
In the parte view we can now define navigation to child states i.e. “View.SubView1” and “View.SubView2”.
Hide Copy Code
<a ui-sref="View.SubView1" href="#View.SubView1">Sub view 1</a>
<a ui-sref="View.SubView2" href="#View.SubView1 ">Sub view 2</a>
<div ui-view></div>
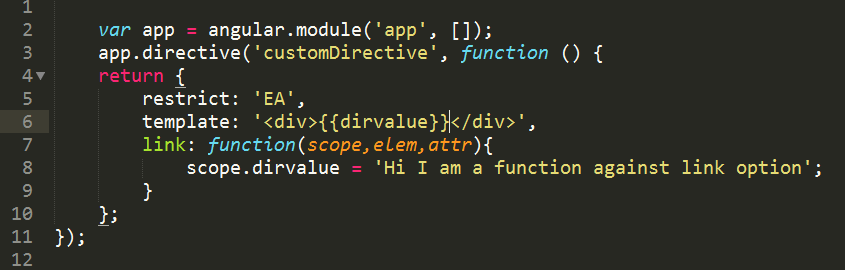
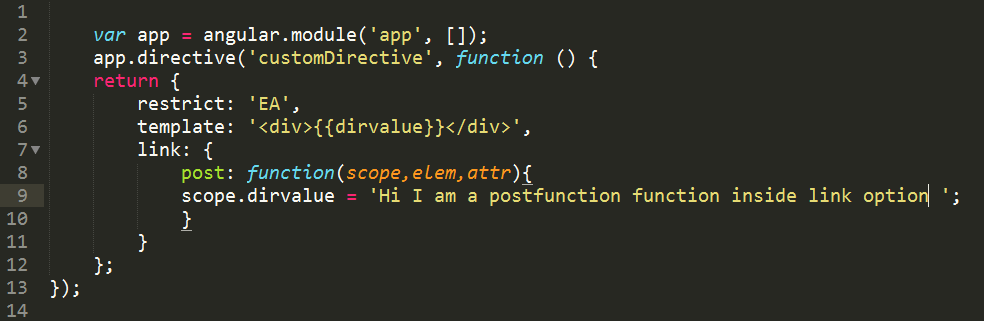
Till now we have looked in to predefined Angular directives like
“ng-controller”,”ng-model” and so on. But what if we want to create our
own custom Angular directive and attach it with HTML elements as shown
in the below code.
Hide Copy Code
<div id=footercompany-copy-right></div>
To create a custom directive we need to use the “directive” function
to register the directive with angular application. When we call the
“register” method of “directive” we need to specify the function which
will provide the logic for that directive.
For example in the below code we have created a copy right directive and it returns a copy right text.
Please note “app” is an angular application object which has been explained in the previous sections.
Hide Copy Code
app.directive('companyCopyRight', function ()
{
return
{
        template: '@CopyRight questpond.com '
 };
});
The above custom directive can be later used in elements as shown in below code.
Hide Copy Code
<div ng-controller="CustomerViewModel">
<div company-copy-right></div>
</div>
For angular custom directive the best practice is to follow camel
casing and that also with atleast two letter’s. In camel case naming
convention we start with a small letter, followed by a capital letter
for every word.
Some example of camel cases are “loopCounter” , “isValid” and so on.
So when you register a custom directive it should be with camel case format as shown in the below code “companyCopyRight”.
Hide Copy Code
app.directive('companyCopyRight', function ()
{
return
{
        template: '@CopyRight questpond.com '
 };
});
Later when this directive is consumed inside HTML before each capital
letter of camel case we need to insert a “-“ as specified in the below
code.
Hide Copy Code
<div company-copy-right></div>
If you are making a one letter prefix like “copyright” it’s very much
possible that tomorrow if HTML team creates a tag with the same name,
it will clash with your custom directive. That’s why angular team
recommends camel case which inserts a “-“ in between to avoid further
collision with future HTML tag’s.
There are different flavors of Angular directives depending till what level you want to restrict your custom directive.
In other words do you want your custom directive to be applied only on HTML element or only on an attribute or just to CSS etc.
So in all there are four different kinds of custom directives:-
- Element directives (E)
- Attribute directives (A)
- CSS class directives (C)
- Comment directives (M)
Below is a simple custom directive implementation at the element level.
Hide Copy Code
myapp.directive('userinfo', function()
{
    var directive = {};
    directive.restrict = 'E';
    directive.template = "User : {{user.firstName}} {{user.lastName}}";
    return directie;
});
The “restrict” property is set to “E” which means that this directive
can only be used at element level as shown in the code snippet below.
Hide Copy Code
<userinfo></userinfo>
If you try to use it at an attribute level as shown in the below code it will not work.
Hide Copy Code
<div userinfo></div>
So “E” for element, “A” for attribute, “C” for CSS and “M” for comments.
Hide Copy Code
directive.restrict = 'EA';
Yes, you can set template to page directly by using “templateUrl” property of the directive as shown in the code snippet below.
Hide Copy Code
directive.templateUrl = "/templates/footer.html";
Promises are POST PROCESSING LOGICS which you want to execute after
some operation / action is completed. While deferred helps to control
how and when those promise logics will execute.
We can think about promises as “WHAT” we want to fire after an
operation is completed while deferred controls “WHEN” and “HOW” those
promises will execute.
For example after an operation is complete you want to a send a mail,
log in to log file and so on. So these operations you will define using
promise. And these promise logics will be controlled by deferred.
We are thankful to www.stepbystepschools.net for the above image.
So once some action completes deferred gives a signal “Resolve”,
“Reject” or “Notify” and depending on what kind of signal is sent the
appropriate promise logic chain fires.
“$q” is the angular service which provides promises and deferred functionality.
Using promises, deferred and “q” service is a 4 step process:-
- Step 1:- Get the “q” service injected from Angular.
- Step 2 :- Get deferred object from “q” service object.
- Step 3 :- Get Promise object from deferred object.
- Step 4 :- Add logics to the promise object.
Below is the angular code for the above 4 steps.
Hide Copy Code
function SomeClass($scope,$q) {
var defer = $q.defer();
var promise = defer.promise;
promise.then(function () {
alert("Logic1 success");
}, function () {
alert("Logic 1 failure");
});
promise.then(function () {
alert("Logic 2 success");
}, function () {
alert("Logic 2 failure");
});
}
So now depending on situations you can signal your promise logics via
deferred to either fire the success events or the failure events.
Hide Copy Code
defer.resolve();
Hide Copy Code
defer.reject();